Products

SAVE UP TO 20%
On all natural stone paving slabs and essentials
My Cart
- +44 1634 470948
- info@iconstones.com
- unit2, central business park, Rochester ME2 4LW, United Kingdom
© 2025 All rights reserved Icon Stones
How to guides
Explore our How-To Guides and Videos for expert tips on installing and maintaining your paving stones, helping you achieve the best possible finish.
Patio Installation — Tools & Guidance
Tools needed to lay my patio?
- A shovel
- Pick axe
- Rubber mallet/Dead blow
- String line
- Spirit level
- Pointing trowel
Always wear suitable Personal Protective Equipment (PPE) as identified through a simple risk assessment and method statement.
When excavating, dig small trial holes or use cable-avoidance tools to check for underground services.
It’s also good practice to visually inspect the work area for any signs of buried utilities before starting.
Patio Sub Grade
When laying a patio directly next to a house, the finished surface must sit at least 150 mm below the damp-proof course (DPC).
Excavate the area to a minimum depth of 300 mm below the DPC to allow for the sub-base and bedding layers.
Compact the sub-grade using static or vibratory equipment to create a stable foundation.
To prevent standing water, provide a fall of 1 in 60 (a 1 cm drop for every 60 cm of width), directing runoff toward storm drains, channels, planters, or verges that drain freely.
Bedding - Laying Porcelain Paving
Full Wet Bed (best practice on a Type 1 sub-base)
Lay the tiles onto a level bed of standard sand/cement mortar mixed to a wet consistency. Use a 6:1 (grit sand : cement) mix, with a mortar depth of 20–40 mm.
Thin-Bed Adhesive (best practice on concrete)
This method replaces sand/cement mortar with an outdoor-grade, polymer-modified adhesive. While common in hotter climates, it is not standard practice in the UK. Apply a suitable primer to the underside of the tiles before laying to ensure full adhesion. Always use tile spacers to maintain consistent joint widths.
Patio colours
Before you or your landscaper begin laying the paving, open all the packs for the project. This allows you to blend the colours naturally, creating a consistent, attractive finish.
Please note that all products may feature slight variations in tone and pattern. For porcelain paving, ensure all items come from the same batch before installation, as batches can vary in shade.
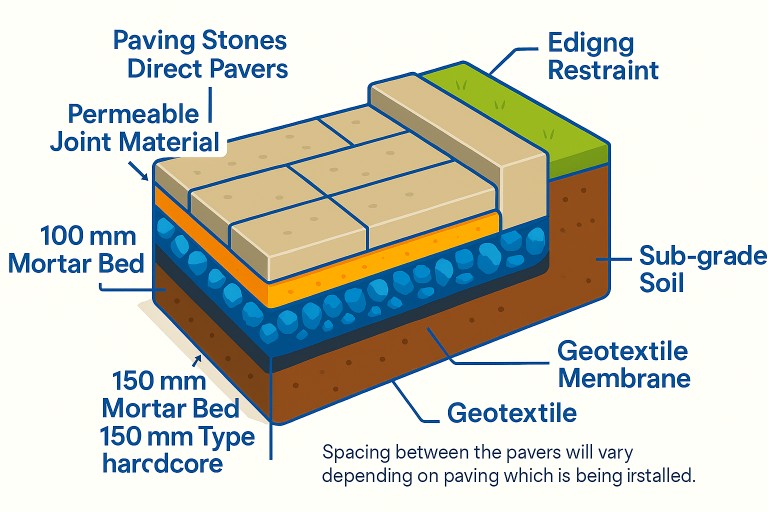
Garden Patio Construction
Ground preparation for natural stone and porcelain paving is largely the same. The construction typically includes the following layers:
- Paving course
- Bedding course
- Subbase
- Sub grade
Patio Sub Base & Geotextile
Selecting the correct sub-base is critical to the long-term performance of your patio — an often-overlooked step.
Lay a geotextile membrane across the entire patio area, cutting it to fit. Contrary to popular belief, its main role is not to stop weed growth, but to prevent the sub-base material from migrating into the sub-grade, reducing the risk of settlement.
Lay a geotextile membrane across the entire patio area, cutting it to fit. Contrary to popular belief, its main role is not to stop weed growth, but to prevent the sub-base material from migrating into the sub-grade, reducing the risk of settlement.
Flexible Sub-base
Use a DTP Type 1 granular sub-base at a depth of 100–150 mm, depending on ground conditions. Compact it in two layers (about half the depth each, or roughly 75 mm) using a vibrating plate or roller.
Rigid Sub-base
For a rigid installation, use a lean concrete mix at a depth of approximately 100 mm, replacing the geotextile with a damp-proof membrane (DPM) at this stage.
Bedding - Laying Natural Stone Paving
Full Wet Bed – Best Practice on a Type 1 Sub-base
Lay natural stone flags onto a level bed of standard sand/cement mortar mixed to a wet consistency.
Use a 6:1 mix of grit sand to cement, with a mortar depth of 20–40 mm.
The process is very similar to laying porcelain paving.
For best adhesion, apply a suitable primer to the underside of each slab before setting it onto the mortar bed.
Patio Jointing
We recommend using a porous jointing compound — such as Rompox or Rompox Easy — for patios laid on a permeable sub-base. These products are popular for their simplicity and ease of application.
For rigid sub-base installations, a non-porous jointing option like Flowpoint is advised. Due to its more complex nature, this product should be applied by an experienced installer.
Take every precaution to keep the paving clean and free from dirt transfer caused by boots, tools, or machinery. Use plenty of clean water and promptly remove any surplus resin when the installation is complete.
Single-part jointing products, such as Rompox, offer the quickest, cleanest, and most user-friendly solution — making them a favourite among contractors across the UK.
Wall Cladding Installation Quick Guide
Quick Tips
- Prime wall prior to installation
- Re-cover tired looking exterior walls
- Lightweight and simple to install
- Incredibly easy to maintain
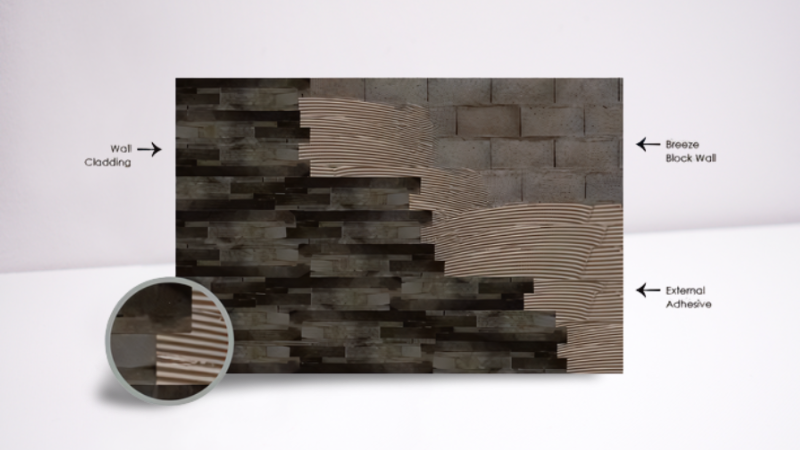
To achieve the best results, always use the correct tools for the task — for example, a power drill with a mixing attachment, a bucket for preparing materials, and a trowel for spreading external adhesive evenly across the wall.
We are the direct importers of Porcelain and Natural Stone Paving products to provide cost effective yet high quality products to home owners and contractors.
Company links
Quick Links
Contact
- Unit2, central business park, Rochester ME2 4LW, United Kingdom
- info@iconstones.com
- +44 7850 748431
Reach us
© 2026 All rights reserved Icon Stones